
Last Updated on April 3, 2023 by Dave Farquhar
A small leak in a basement wall can scare people off. It looks like it should be an expensive repair and a precursor to all sorts of other problems. But there’s a DIY repair for a small basement leak that is easy, inexpensive, and effective.
If the basement wall has severe cracks, you probably need to bring in a professional. Assuming the wall hasn’t moved, you’re looking at a couple hundred dollars to have a professional fix it. If the walls are moving, that’s a bigger issue and definitely needs professional help. But you can fix small leaks yourself cheaply and easily, especially if it’s a chip, not a crack.
Not every chip or crack leaks. That said, even if a chip or crack has been dry for years, it can start leaking at some point. If there’s a weak point in your foundation, water will probably find it eventually, but it can take years. Shore it up, and the water will find somewhere else to go.
A quick DIY repair for a small leak in a basement wall
Chips in basement walls are fairly common, often the result of misguided home improvement projects. To fix one, go to the plumbing section of a hardware or home improvement store. Buy a stick of plumber’s epoxy putty. The no-name brand is usually a couple of dollars cheaper than a big name brand like Loctite and will work just as well. For example, Home Depot sells a brand called RectorSeal for around $4. A 2-ounce stick is enough to fix a pretty large chip in the wall. Look for it in the plumbing aisle, not in the adhesives aisle. The stuff in the plumbing aisle is just as good but costs a couple of dollars less.
Epoxy will cure even if it’s wet, but it will stick better to a clean, dry surface. If at all possible, wait for a dry day when the spot isn’t leaking. Running a dehumidifier will help to dry it out quickly. You can also try hitting the affected area with a heat gun to help dry it out.
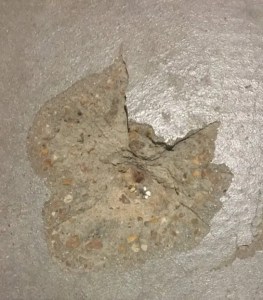
Applying epoxy putty to the chip that’s leaking in your basement

To repair the small leak in your basement wall, break off a piece of epoxy putty big enough to fill the low spot in the wall. Roll and kneed it in your hands until the color is consistent, with no marbling or lines in it. You will feel it heat up a bit once you mix it consistently. Once it starts getting warm, you don’t have a lot of time left to apply it. Press it tightly into the hole in the wall. If it doesn’t fill it completely that’s OK. Just come back and follow up with a bit more.
If you mix up too much and end up with a bulge, that’s OK. Just smooth it out as best you can. A bulge of a few millimeters won’t hurt anything. I like to use a small length of dowel as a roller to try to smooth the putty relative to the surrounding area, if time permits.
The epoxy sets up in 15-30 minutes, and fully cures in a matter of hours.
If there are other chips in the concrete near the one you fixed, go ahead and fix those too. If the water can’t escape through the chip you just fixed, it may find another one nearby.
Blending in the repair in your basement wall
Once it cures, the epoxy remains a dark gray color that probably won’t match the color of the rest of the basement wall. Epoxy putty takes paint well, so you can paint it a color closer to the rest of the wall. For extra protection, paint it and the area around it with Drylock paint, taking extra effort to get the paint into the edge where the epoxy meets the concrete, since that’s a potential spot where any future seepage could occur, if it ever does.
You can get the Drylock tinted if you’d like, but color matching Drylock doesn’t work as well as other paints. After the Drylock dries, you can follow up with another coat of paint that matches the surrounding wall better.
What about cracks?
I’m willing to use this quick, cheap method on chips because I know exactly how far into the wall it goes. You can’t be certain of how far back a crack goes. If you have a crack in the wall and it’s not leaking, you can leave it alone. Not all cracks leak, and not all cracks ever start to leak. My tips for stopping hydrostatic seepage also help keep cracks dry.
If you do have a leaking crack, it’s best to call in a professional. A professional will fix a crack for around $200 and guarantee it, even after you sell the home. A professional crack repair involves injecting epoxy into the concrete to seal the crack all the way through, in addition to applying epoxy to the visible surface. If it ever leaks again, they’ll come out and inject more epoxy and shore up the visible surface as necessary. But recurrence after a professional repair is uncommon.
So while a leaking crack is a more expensive repair than a simple chip, it’s still not a ruinous expense.
David Farquhar is a computer security professional, entrepreneur, and author. He started his career as a part-time computer technician in 1994, worked his way up to system administrator by 1997, and has specialized in vulnerability management since 2013. He invests in real estate on the side and his hobbies include O gauge trains, baseball cards, and retro computers and video games. A University of Missouri graduate, he holds CISSP and Security+ certifications. He lives in St. Louis with his family.