
Last Updated on September 2, 2017 by Dave Farquhar
Disassembling a Marx 490 locomotive isn’t too difficult, but it’s very different from other Marx locomotives.
Once you take one apart, though, you’ll see why it was designed how it was. It was Marx’s lowest-cost locomotive, and it could be assembled without tools, so the labor costs were minimal.
For that matter you only need one tool to take it apart, and since there’s so little in it that can break–not even a headlight–you can find anything you would need to service it at the nearest hardware store or auto parts store.
What you’ll need
Projects like this always go more quickly when you have what you need in advance.
- Medium-sized Slotted screwdriver
- Household oil (synthetic 10W-30 recommended)
- Household grease (Lucas Red n’ Tacky grease recommended)
- Cotton swabs
- Mineral spirits
- Compressed air (optional)
Dropping out the Marx 490 motor

There is an early variant of the 490 that assembles with pegs and two holes right in front of the siderods. This procedure doesn’t cover that variant because it’s much easier to take apart. Pry the body away from the pegs a bit, and it comes apart and goes back together just like a 999, only without the screws. There is another variant that actually uses screws, so taking it apart and putting it back together is exactly like a Marx 999.
We’ll cover the variant that assembles with tabs and slots here.
The process basically involves twisting a screwdriver, and knowing where the screwdriver goes, so I’m going to explain this with a lot of pictures.
It’s not necessarily obvious from first looking at it how the locomotive comes apart, but it’s easier than it looks.
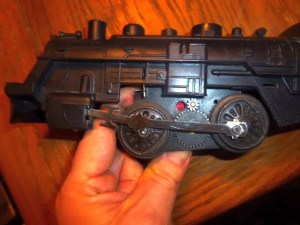
The first step is to insert a screwdriver underneath the siderod right next to the metal tab in the plastic slot in the side of the locomotive, as you see to the left. Twist the screwdriver, then with your other hand tug downward. You’ll hear a bit of snap, but don’t worry. You didn’t break anything.

At this point, your locomotive should look a lot like what you see to the right. Next, turn the locomotive over and repeat the same process on the other side. You’ll find the second side goes much easier, since there’s little to no resistance left.

With the tabs freed, slide the motor forward. There are two slots in the back of the motor that engage slots in the locomotive cab. Once you free that, the motor slides forward easily, and then it’s easy to pull the motor down, away from the rest of the body, then pull it back to disengage the siderods.
At this point the motor is completely free.
Service the motor as needed. I have some advice on cleaning and lubricating Marx motors here if you need it. I do recommend testing the motor before reassembling the locomotive, but the 490’s design is so simple that you can probably reach in and make minor tweaks if necessary without disassembling it again.
Let’s talk lubricants for a minute. Lucas Red n’ Tacky grease works splendidly and is available near you. While you’re there, pick up a quart of synthetic 10W-30. Apply grease to the gears with a toothpick, then apply a drop of oil to the wheels where the axles meet the bearings with another toothpick. Use the leftover oil in your lawnmower come spring.
Something else you’ll want to do while you have the motor out is to clean the driver wheels. They are always filthy, even if they look clean, and will run much better after a cleaning. A cotton swab with some mineral spirits is the cheapest way to clean the gunk off them. Mineral spirits, if you’re not familiar with it, is a cheap and effective solvent sold in hardware and home-improvement stores in the paint aisle. It’s normally sold as a paint thinner.
It would also be a good idea to blow the motor out with some compressed air. You can get by without this step, but it can loosen some of the debris that’s accumulated through the ages and make it easier to get it clean.
Painting the Marx 490
If you’re taking the 490 apart to paint it, be sure to wash the body with a cleaner like Simple Green first and let it dry thoroughly. Prime the locomotive and then paint it using whatever paints you’re most comfortable with. The 490 lends itself well to painting, as the body has a fair bit of cast-in detail, especially given the price it was designed to sell for. When you paint it with flat paints, it helps bring some of that detail out and make it look like a costlier locomotive.
Ideally you should paint outdoors on a day that the temperature is at least 50 degrees, and on a sunny day so the locomotive can dry in direct sunlight. Since the body is plastic, don’t try baking it as you might a metal locomotive.
Follow the paint manufacturer’s instructions regarding drying time and between coats and before handling. A good general rule is to the paint dry thoroughly, at least 24 hours, before reassembling.
Adding a headlight
The Marx 490 frequently didn’t come with a headlight, but there’s plenty of room inside to add one if you want. You’ll want to acquire an E10 screw base socket and a 1449 bulb, and you’ll need two pieces of stiff wire. Solder one wire to the copper strip next to the axle toward the front of the locomotive, and the other wire to the front of the pickup shoe on the bottom of the motor. Then solder one of the wires to one of the tabs on the socket, and the other wire to the other. The polarity doesn’t matter. Screw the bulb into the socket, then bend the wire to position the light so it shines out the headlight in the front of the locomotive. You might want to use an LED bulb to minimize the amount of light that bleeds out the underside of the locomotive, since the 490 doesn’t have much inside to obstruct the light.
Replacing the Marx 490 motor

Putting the motor back in is tricky the first time you do it, but if you did it several times, you could probably do it in 30 seconds. It goes back together with no tools.
One of the reasons Marx could sell the 490 so cheaply was because there was so little labor involved in putting it together.
The trickiest part is holding the mount fast to the motor while lining up everything that needs to line up. Just keep trying; it’s doable.
First, before attempting reassembly, look things over carefully and make sure you get everything lined up. The large plastic guide in the middle is the biggest obstacle to getting the motor back in. Don’t knock up against that guide, and you’ll be OK.

The first step is to push the siderods back into their openings. Don’t try to get anything else right yet; just get the two siderods where they belong.
Don’t worry too much at this point if the motor mount pops back off. It’s easy enough to put it back.
Hold the motor mount in place with your index finger, then use your other hand to line the motor up with the slots in the locomotive cab.
Expect to have to fumble around a bit getting the two parts to line up. That’s because once they do line up, it’s a tight fit without much play in it.

Once you do get the slots lined up in the back, you’ll notice the front tabs are lined up perfectly beneath the slots in the plastic body. Place your free hand on the top of the locomotive body and push up with your thumb, and the motor snaps right into place with no tools. The only trick to putting a 490 together is having a bit of coordination and knowing where the parts line up.
Removing and Replacing the pickup shoe
If you need to remove the pickup shoe to replace it, it pries off fairly easily with a slotted screwdriver. Hold the shoe in the upward position and pry on one side, where the hole in the shoe slides into the motor’s base plate. Just pry slightly and the shoe will pop out fairly easily. Sometimes the plate has a screw under it and sometimes there are two springy clips underneath the shoe. Be careful not to lose the spring if there is one present.
To replace the shoe, slide one side onto the notch in the pickup plate, then tilt it down to the other end. If it doesn’t clear the notch, spread the pickup slightly with either a pair of needlenose pliers or a slotted screwdriver until it clears the tab, then drop it into place. If the shoe has integrated springy clips, slide those into place as you pop the pickup shoe in.
Overview and history of the Marx 490
I put this at the end since you probably already have one if you’re reading this, but if you want to know everything about this inexpensive 0-4-0 locomotive, here’s everything I know.
The 490 was produced from 1962 to 1974 and it headed up Marx’s least expensive electric sets. It’s easy to find sets from the early 1970s that Marx sold through discount stores at a price of around $15. That would be $70-$85 in 2014 dollars, for a train set with a locomotive, track, transformer, a handful of cars, and sometimes some paper scenery. That’s about half the price of Lionel’s cheapest starter sets today.
Most of the variants have to do with how the locomotive went together. It was usually sold with a single-reduction motor, but some models ended up with double-reduction motors in them. It’s always worth looking at beat-up 490s at train shows to see which motor is inside. If you find an early variant that assembled with screws, the motor will fit most other Marx locomotives, making it a worthwhile purchase even if the cowcatcher and cab are broken from too many falls from a table.
The late-production Marx motors were extremely dependable. By the time the 490 came around, Marx had three decades of experience working out any issues. Marx kept a train running in the showroom all the time that the showroom was open, and when the engine finally broke, Marx’s engineers would look at what had failed, then adjust the design so that component would last longer.
Design-wise and price-wise, the 490 was a throwback to the Depression, when several companies offered basic locomotives with no lighting that just traveled in one direction, hoping to hit a $2.99 price point (approximately $50 in 2014 dollars) for a locomotive, track, transformer, and a single car. Then again, by 1962 when the 490 was released, trains had gone from the must-have toy to a passing fad. Marx’s rivals were hurting, and while neither of them were willing to sell a $15 train set, Marx was. Given the number of 490s out there, it seems to have worked.
Today the 490 makes a good Christmas tree train, due to its low cost, simplicity and dependability. A single-direction 490 isn’t going to reverse itself on the track unexpectedly. And when things happen–which they will–a 490 is easy to fix and cheap to replace if necessary.
Parting thoughts
If this is the first time you’ve tried to fix a train, the Marx 490 is a good choice because it comes apart and goes back together easily, there’s very little to break, and if something does go horribly wrong, it’s cheap to replace.
I didn’t learn how to fix trains until I was well into adulthood. When I was a kid, I didn’t have anyone around who had much in the way of mechanical ability to learn from. I started picking this up when I unboxed the trains that had belonged to my dad growing up and some of his stuff didn’t work. I share what I’ve learned (and, let’s face it, what I’m still learning) in hopes of other people being able to use it to do the same thing.
You’ll find it’s well worth the effort. Marx trains are very dependable, and I find it relaxing to watch a train pull its consist around a layout at the end of a long day.
I hope you’ve found this post helpful. If you have, please share a link, whether it’s on your own blog, a forum, a discussion group, Twitter, or Facebook. Thank you!
David Farquhar is a computer security professional, entrepreneur, and author. He started his career as a part-time computer technician in 1994, worked his way up to system administrator by 1997, and has specialized in vulnerability management since 2013. He invests in real estate on the side and his hobbies include O gauge trains, baseball cards, and retro computers and video games. A University of Missouri graduate, he holds CISSP and Security+ certifications. He lives in St. Louis with his family.